Tuesday, September 22, 2009
Follow The Sirona Springs Blog to our new location!
I will no longer be cross-posting on this blog AND my new blog over on Wordpress. So PLEASE click over to the new address: bookmark it, subscribe to it, RSS it, whatever you're into (live and let live, I always say). But don't miss out on any more posts! I'd miss you. :(
Tuesday, September 1, 2009
Selling at ArtFire Just Got More Interesting
Until very recently, I was seriously considering closing my Sirona Springs studio at ArtFire, but they have come through in the clutch and I am a believer again!
(Read the rest of the blog post at the new Sirona Springs Blog.)
(Read the rest of the blog post at the new Sirona Springs Blog.)
Friday, August 28, 2009
Soapmaking Design Results
Cutting a new batch of soap is always a thrill. Will it look good? Or will it even look at all how I envisioned it would look? But cutting into the batches that we made in my recent Advanced Design class was extra exciting because I knew that there were several other soapmakers that were just as invested in the outcome as I was. And (yeah!) I'm really pleased with them. They are all different but so interesting in their own way. I could never pick a favorite. (A good sign, I think.) If you missed my last post, you can read about the class here, but now let's look at the results!

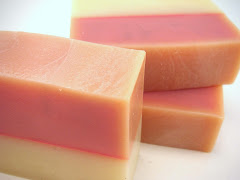
A layered bar with a wavy top
Can you pick a favorite? Feeling inspired? Which of these would YOU like to make (or buy)?
A layered bar with a wavy top

- Some bars from a funnel swirl batch

- "In-the-pot" swirl

- Embedded soap shapes add real interest
Monday, August 24, 2009
Moving Blog to New Address
Attention readers (and especially followers): I will be moving my blog to a new address starting now. I will continue to double-post for a while (hopefully, I won't regret that) but for now head over to my new blog site and sign up for email delivery or RSS feed so that you don't miss any posts.
This is a bit of a nuisance for you all, I know, and I considered it for a long time. But once I got familiar with Wordpress I couldn't resist. I hope you will feel the same way.
So head on over and leave me a comment, good or bad. I can take it.
This is a bit of a nuisance for you all, I know, and I considered it for a long time. But once I got familiar with Wordpress I couldn't resist. I hope you will feel the same way.
So head on over and leave me a comment, good or bad. I can take it.
Sunday, August 23, 2009
Teaching Advanced Techniques in Soap Design
Yesterday was a full day of soapmaking and teaching and teaching soapmaking. It was the first time that I taught my brand-new class "Advanced Cold Process Soap Design with Loaf Molds" at The Nova Studio. (With a title that long, no wonder we needed 5 hours of class time!) I showed a great group of students lots of techniques and ideas for jazzing up their soap with some color and design. And we even made four batches of soap in that one class -- a personal record for me!

- It was a great group of students, some coming from as far away as Truckee and Arcadia!

- Some of the sample bars that I brought to explain different techniques.

- Coloring some soap with ultramarine blue.

- Alana, the TA for this class, was indispensible.

- I put the students to work, making shapes to be embedded in a new batch of soap.

 I had a great time, and I think that the students did, too. Tomorrow I'll cut the soap into bars and get ready to send every student a bar from each batch.
I'll be teaching this class again soon, so check with The Nova Studio now if you'd like to join me next time!
And many thanks to Rick (one of the students) for all the great pictures.
Friday, June 26, 2009
Chunky Crayons for Chunky Toddler Fingers
 While browsing for all things crafty, I came across this great idea from Tiph for revamping all those broken crayons that never get used and instead get slowly relegated to the bottom of the crayon box. Making big, easy-to-hold crayons is so clever, and her photography made me smile. I was instantly drawn in (they look a lot like soap, don't you think?)
Check out her simple tutorial and make some this weekend!
Saturday, June 13, 2009
How to Test Soap Colorants
I was recently helping Lori Nova of The Nova Studio with testing different kinds of soap colorants. She was preparing for a presentation at the Handcrafted Soapmakers Guild Annual Conference called "Coloring With Confidence": a survey of over 70 different kinds of soap colorants: oxides, ultramarines, herbs, spices, lakes, dyes... It was a great presentation with loads of great information. For anyone near enough to the Studio who missed the Conference, Lori has turned her presentation into a class being offered this summer.
Anyway, this all got me thinking that what would really help me is to know how much of my colorants to use to get the shade that I want. I typically use oxides, ultramarines and micas. I don't want to use too much and waste it (or worse, get colored lather - especially red - ewww) or use too little and not get the effect that I want. So I've designed a procedure to test different concentrations of my colorants. I have used it to test four different colors so far and am happy with the results.
Step 1: Decide what to test.
Pick which concentrations you want to test. Four different concentrations seems to give a good range of color. I recently tested some oxides at 1 teaspoon(tsp) per pound of oil (ppo), 1/2 tsp ppo, 1/4 tsp ppo and 1/8tsp ppo. The same concept can be used to test other colorants (that may need more or less) by adjusting the amount added to each sample.
 Step 2: Prepare your containers.
I used paper cups as soap containers and prepared them by labeling them with the colorant and the concentration for each cup. This picture shows the cups for testing 3 different oxides in 4 concentrations each. (I was feeling productive!)
Step 3: Make a 1-pound batch of unscented soap for each colorant that you're testing.
Since some scent will affect color, it's best to start with no scent. Calculate the total volume of your soap batch (depending on your lye and water amounts) and divide by 4. This is the amount that will go into each cup.
Step 4: Add colorant to each cup.
Remember, the amount of colorant that you want to add is enough to get the right concentration in 1/4 pound per oil. So, in my example, the first cup gets 1/4tsp of colorant (because I want the concentration to be 1tsp ppo and I'm going to put in 1/4 pound of soap, right?). The cup labeled 1/2tsp ppo gets 1/8 tsp of colorant and so on. Hint: if you are using a dry colorant, like oxide or ultramarine, it's a good idea to suspend it in a little water and blend it before going on to the next step.
 Step 5: Add 1/4 of your batch of soap to each cup and stir, stir, stir until the color is blended evenly.
Step 6: Cover containers and leave to saponify.
 Step 7: Rip off the paper cup and admire your colorful soap!
This would be a good time to take a picture, too.
 Step 8: Label your soap by carving in the concentration with a dull pencil or skewer.
This is my result from 1/2tsp ppo of burgundy oxide.
One final note: if you were paying attention and doing the math along with me, you will have noticed that the last cup in my series (the one with a concentration of 1/8tsp ppo) would have needed 1/32 tsp of colorant. That's a very small amount to measure accurately. Often, you're lucky if you have a 1/8tsp measure in your measuring spoon set! How I got around that was to take one half of the soap in the 1/4tsp ppo (once I had colored it) and put that in the 1/8tsp ppo cup. Then I added an equal amount of uncolored soap and, TA-DA!, soap at 1/8tsp ppo. I end up with less of that 1/4tsp ppo soap (you can see that clearly in the picture of the soap in the cups above) ,but it is still plenty to keep as a sample.
I hope that this is helpful and that I have encouraged you to try it for yourself. Remember, it can be used not just with oxides, but any kind of colorant: other pigments, micas, clays, herbs, dyes. It takes some planning and time, but I expect that I'll be referring to the results of these trials over and over again.
I would love to hear what you think if you try this method, or if you come up with another method of your own!
Subscribe to:
Posts (Atom)